2017년 6월 28일 수요일
[Cluster] Pacemaker and HAProxy - HA구성
[Cluster] Pacemaker and HAProxy - HA구성
출처: https://m.blog.naver.com/PostView.nhn?blogId=sunsync&logNo=220802338953
-- cluster를 구성하는 모든 node에 설치 --
-- vip : 192.168.56.202
-- vip : 192.168.56.203
-- vip : 192.168.56.204
-- node1: root@cent7_m_hp1 서버 - 192.168.56.131
-- node2: root@cent7_m_hp2 서버 - 192.168.56.132 -- 서버 : CentOS7, haproxy-1.5.14-3.el7.x86_64 pacemaker-1.1.13-10.el7_2.4.x86_64-- HAProxy 설정은 목록의 'HAProxy 설정' 참고-- 모든 테스트는 PC에 Oracle VM을 이용 가상서버들을 설치하여 진행했음.
1. 시간 동기화
- 여러서버가 통신하는데 시간 동기화는 매우 중요한 요소, 여기서는 ntp를 이용 시간 동기화
# yum install ntp
2. 방화벽 설정
- corosync는 udp 5404 ~ 5406 포트를 사용. 방화벽에서 설정해 줌.
ex)
# iptables -A INPUT -i eth1 -p udp -m multiport --dports 5404,5405,5406 -m conntrack --ctstate NEW,ESTABLISHED -j ACCEPT
# iptables -A OUTPUT -o eth1 -p udp -m multiport --sports 5404,5405,5406 -m conntrack --ctstate ESTABLISHED -j ACCEPT
3. host name 등록(모든 node 동일)
[root@cent7_m_L1 ~]# vi /etc/hosts
127.0.0.1 localhost
::1 localhost
192.168.56.131 ha-master.exam.com ha-master
192.168.56.132 ha-slave.exam.com ha-slave
4. pacemaker 설치(모든 node 동일)
-- pacemaker를 설치하면 의존성으로 corosync도 설치가 됨
-- pcs는 pacemaker와 corosync를 config하는 tool
-- pcs를 설치하면 pcsd가 설치가 됨.
-- pcsd is openssl based daemon written in ruby, manages pcs authentication between nodes,
-- the authentication files are located in /var/lib/pcsd.
[root@cent7_m_hp1 /var/log]# yum install pacemaker pcs
[root@cent7_m_hp2 /var/log]# yum install pacemaker pcs
5. pcsd 서비스 시작(모든 node 동일)
[root@cent7_m_hp1 /var/log]# systemctl start pcsd
[root@cent7_m_hp2 /var/log]# systemctl start pcsd
6. cluster node간 인증을 위한 설정(모든 node 동일)
-- 이들 패키지 설치로 인해, 시스템에 새로운 user가 만들어짐(hacluster).
-- 1) 클러스터를 구성 할 노드 인증, node들간의 user,password를 동일하게 설정.
-- 2) 클러스터 노드를 구성하고 동기화.
-- 3) 클러스터 노드에서 클러스터 서비스를 시작,중지
[root@cent7_m_hp1 /etc/corosync]# passwd hacluster
[root@cent7_m_hp2 /etc/corosync]# passwd hacluster
7. cluster node간의 인증(master node 에서만 적용)
[root@cent7_m_hp1 /var/lib]# pcs cluster auth ha-master.exam.com ha-slave.exam.com -u hacluster -p
Username: hacluster
Password:
ha-slave.exam.com: Authorized
ha-master.exam.com: Authorized
[root@cent7_m_hp1 /var/lib]#
-- 위 실행 후 /var/lib/pcsd/tokens 파일에 토큰 정보 생성
8. 'Main_Cluster'라는 cluster를 만들고, corosync config를 node간에 동기화(master node에서)
[root@cent7_m_hp1 /var/lib]# pcs cluster setup --name Main_Cluster ha-master.exam.com ha-slave.exam.com
Shutting down pacemaker/corosync services...
Redirecting to /bin/systemctl stop pacemaker.service
Redirecting to /bin/systemctl stop corosync.service
Killing any remaining services...
Removing all cluster configuration files...
ha-master.exam.com: Succeeded
ha-slave.exam.com: Succeeded
Synchronizing pcsd certificates on nodes ha-master.exam.com, ha-slave.exam.com...
ha-slave.exam.com: Success
ha-master.exam.com: Success
Restaring pcsd on the nodes in order to reload the certificates...
ha-slave.exam.com: Success
ha-master.exam.com: Success
[root@cent7_m_hp1 /var/lib]#
9. starting cluster(master node에서)
root@cent7_m_hp1 /etc/corosync]# pcs cluster start --all
ha-master.exam.com: Starting Cluster...
ha-slave.exam.com: Starting Cluster...
[root@cent7_m_hp1 /etc/corosync]# pcs status
Cluster name: Main_Cluster
WARNING: no stonith devices and stonith-enabled is not false
Last updated: Wed Aug 31 15:57:03 2016 Last change: Wed Aug 31 15:56:51 2016 by hacluster via crmd on ha-slave.exam.com
Stack: corosync
Current DC: ha-slave.exam.com (version 1.1.13-10.el7_2.4-44eb2dd) - partition with quorum
2 nodes and 0 resources configured
Online: [ ha-master.exam.com ha-slave.exam.com ]
Full list of resources:
PCSD Status:
ha-master.exam.com: Online
ha-slave.exam.com: Online
Daemon Status:
corosync: active/disabled
pacemaker: active/disabled
pcsd: active/enabled
[root@cent7_m_hp1 /etc/corosync]#
[root@cent7_m_hp1 /etc/corosync]# pcs status corosync
Membership information
----------------------
Nodeid Votes Name
1 1 ha-master.exam.com (local)
2 1 ha-slave.exam.com
[root@cent7_m_hp1 /etc/corosync]#
-- cluster를 멈출때
# pcs cluster stop [--all] [node] [...]
-- local node에서 강제로 멈출때
# pcs cluster kill
-- node를 standby mode로 바꿀때, 또는 제거할때
# pcs cluster standby node_name | --all
# pcs cluster unstandby node_name | --all
-- cluster의 모든 config 파일과 내용을 지우고 cluster를 멈출때
# pcs cluster stop
# pcs cluster destroy
10. Disabling STONITH and Ignoring Quorum
-- What is STONITH (Shoot The Other Node In The Head) ?
You will see a warning in the output of pcs status that no STONITH devices are configured
and STONITH is not disabled:
-- What is Quorum?
A cluster has quorum when more than half of the nodes are online.
Pacemaker's default behavior is to stop all resources if the cluster does not have quorum.
However, this does not make sense in a two-node cluster; the cluster will lose quorum if one node fails.
For this tutorial, we will tell Pacemaker to ignore quorum by setting the no-quorum-policy:
[root@cent7_m_hp1 /etc/corosync]# pcs property set stonith-enabled=false
# change to "ignore", it does not need for 2 nodes cluste
[root@cent7_m_hp1 /etc/corosync]# pcs property set no-quorum-policy=ignore
11. 가상IP 구성 및 관리그룹생성(한쪽 node에서만 진행, 주로 master에서)
-- 가상IP 리소스를 추가
-- 이를위해 'ocf:heartbeat:IPaddr2' (기본임) 리소스 agent를 구성,
-- 모든 리소스 agent는 2 ~ 3개의 필드로 이루어짐.
-- 첫째 - resource class, OCF (Open Cluster Framework)
둘째 - 표준에 의존
셋째 - resource agent 이름
-- 다음은 'Main_VIP' 라는 resource를 VIP:192.168.56.202, netmask-32bit, 모티너링 interval - 10초 로 생성
-- 'Sub_VIP', 'Etc_VIP' 는 테스트를 위해 생성하는 것임.
[root@cent7_m_hp1 /etc/corosync]# pcs resource create Main_VIP IPaddr2 ip=192.168.56.202 cidr_netmask=32 op monitor interval=10s
[root@cent7_m_hp1 /etc/corosync]# pcs resource create Sub_VIP IPaddr2 ip=192.168.56.203 cidr_netmask=32 op monitor interval=10s
[root@cent7_m_hp1 /etc/corosync]# pcs resource create Etc_VIP IPaddr2 ip=192.168.56.204 cidr_netmask=32 op monitor interval=10s
[root@cent7_m_hp1 /etc/corosync]# pcs status
-- 그룹 만들기
[root@cent7_m_hp1 /etc/corosync]# pcs resource group add VIP_Group Main_VIP Sub_VIP Etc_VIP
[root@cent7_m_hp1 /etc/corosync]# pcs status
Cluster name: Main_Cluster
Last updated: Thu Sep 1 15:22:36 2016 Last change: Thu Sep 1 15:19:53 2016 by root via cibadmin on ha-master.exam.com
Stack: corosync
Current DC: ha-slave.exam.com (version 1.1.13-10.el7_2.4-44eb2dd) - partition with quorum
2 nodes and 3 resources configured
Online: [ ha-master.exam.com ha-slave.exam.com ]
Full list of resources:
Resource Group: VIP_Group
Main_VIP (ocf::heartbeat:IPaddr2): Started ha-master.exam.com
Sub_VIP (ocf::heartbeat:IPaddr2): Started ha-master.exam.com
Etc_VIP (ocf::heartbeat:IPaddr2): Started ha-master.exam.com
PCSD Status:
ha-master.exam.com: Online
ha-slave.exam.com: Online
Daemon Status:
corosync: active/disabled
pacemaker: active/disabled
pcsd: active/enabled
[root@cent7_m_hp1 /etc/corosync]#
12. slave node에서도 상태확인
[root@cent7_s_hp2 /etc/corosync]# pcs status
13. 부팅시 서비스 시작을 위해 등록(모든 node에 적용)
[root@cent7_m_hp1 /etc/corosync]# systemctl enable pcsd
[root@cent7_m_hp1 /etc/corosync]# systemctl enable corosync
[root@cent7_m_hp1 /etc/corosync]# systemctl enable pacemaker
14. 각 config file 확인
[root@cent7_m_hp1 /etc/corosync]# more corosync.conf
[root@cent7_m_hp1 /var/lib/pcsd]# more pcs_settings.conf
[root@cent7_m_hp1 /var/lib/pcsd]# more pcs_users.conf
[root@cent7_m_hp1 /var/lib/pcsd]# more tokens
15. 가상 IP 확인
-- 실제 interface에는 올라오지 않음.
[root@cent7_m_hp1 /var/lib/pcsd]# ip addr
...
3: enp0s8: <BROADCAST,MULTICAST,UP,LOWER_UP> mtu 1500 qdisc pfifo_fast state UP qlen 1000
link/ether 08:00:27:ce:a2:a1 brd ff:ff:ff:ff:ff:ff
inet 192.168.56.131/24 brd 192.168.56.255 scope global enp0s8
valid_lft forever preferred_lft forever
inet 192.168.56.202/32 brd 192.168.56.255 scope global secondary enp0s8
valid_lft forever preferred_lft forever
[root@cent7_m_hp1 /var/lib/pcsd]#
[root@cent7_m_hp1 /var/lib/pcsd]# ifconfig
...
enp0s8: flags=4163<UP,BROADCAST,RUNNING,MULTICAST> mtu 1500
inet 192.168.56.131 netmask 255.255.255.0 broadcast 192.168.56.255
ether 08:00:27:ce:a2:a1 txqueuelen 1000 (Ethernet)
RX packets 46174 bytes 5641875 (5.3 MiB)
RX errors 0 dropped 0 overruns 0 frame 0
TX packets 64794 bytes 8655261 (8.2 MiB)
TX errors 0 dropped 0 overruns 0 carrier 0 collisions 0
[root@cent7_m_hp1 /var/lib/pcsd]#
16. haproxy 로드밸런서 resource 를 만들고 그룹으로 등록
-- HA 부하분산으로 VIP그룹과 LB그룹이 서로 다른 node에서 실행됨.
-- 제약조건으로 이를 한곳에서 실행할 수있게 제한
[root@cent7_m_hp1 /etc/corosync]# pcs resource create HAProxy_LB systemd:haproxy op monitor interval=10s
[root@cent7_m_hp1 /etc/corosync]# pcs resource group add LB_Group HAProxy_LB
[root@cent7_m_hp1 /etc/corosync]# pcs status
Cluster name: Main_Cluster
Last updated: Thu Sep 1 15:30:16 2016 Last change: Thu Sep 1 15:28:04 2016 by root via cibadmin on ha-master.exam.com
Stack: corosync
Current DC: ha-slave.exam.com (version 1.1.13-10.el7_2.4-44eb2dd) - partition with quorum
2 nodes and 4 resources configured
Online: [ ha-master.exam.com ha-slave.exam.com ]
Full list of resources:
Resource Group: VIP_Group
Main_VIP (ocf::heartbeat:IPaddr2): Started ha-master.exam.com
Sub_VIP (ocf::heartbeat:IPaddr2): Started ha-master.exam.com
Etc_VIP (ocf::heartbeat:IPaddr2): Started ha-master.exam.com
Resource Group: LB_Group
HAProxy_LB (systemd:haproxy): Started ha-slave.exam.com
PCSD Status:
ha-master.exam.com: Online
ha-slave.exam.com: Online
Daemon Status:
corosync: active/enabled
pacemaker: active/enabled
pcsd: active/enabled
[root@cent7_m_hp1 /etc/corosync]#
-- 리소스 그룹 만들기
-- 그룹에 속한 리소스들은 순차적으로 실행되고, 역순으로 종료한다.
1)만들기
# pcs resource group add group_name resource_id...
2)제거하기(주의, 리소스아이디가 없으면 그룹자체가 지워짐)
# pcs resource group remove group_name resource_id...
3)그룹리스트 보기
# pcs resource group list
18. 제약조건 생성
-- 필요에 의해 같은 곳에 있어야하는 리소스는 제약조건을 걸어야 함.
-- 모든 VIP 리소스가 LB리소스와 연동되는 상황
-- VIP 각 리소스에 HAProxy_LB를 매핑할 필요 없이 최초 하나의 VIP와 연결시키면 됨.
[root@cent7_m_hp1 /etc/corosync]# pcs constraint colocation add HAProxy_LB with Main_VIP score=INFINITY
-- 제약 체크 순서는 VIP -> LV 데몬으로 한다.
-- 맨 마지막 VIP와 LB를 연결해 관리
[root@cent7_m_hp1 /etc/corosync]# pcs constraint order set Main_VIP Sub_VIP Etc_VIP
[root@cent7_m_hp1 /etc/corosync]# pcs constraint order set Etc_VIP HAProxy_LB
-- 마스터IP(location)에서 주된 서비스를 하도록 설정(일부는 반대로 slave에서 하도록 할 수도 있음)
[root@cent7_m_hp1 /etc/corosync]# pcs constraint location Main_VIP prefers ha-master.exam.com=INFINITY
[root@cent7_m_hp1 /etc/corosync]# pcs constraint location Sub_VIP prefers ha-master.exam.com=INFINITY
[root@cent7_m_hp1 /etc/corosync]# pcs constraint location Etc_VIP prefers ha-master.exam.com=INFINITY
[root@cent7_m_hp1 /etc/corosync]# pcs constraint location HAProxy_LB prefers ha-master.exam.com=INFINITY
-- order 제약 삭제[root@cent7_m_hp1 /etc/corosync]# pcs constraint order remove [constraint id-- 제약 확인
[root@cent7_m_hp1 /etc/corosync]# pcs constraint --full
18. 리소스 이동
1) 한 노드에서 동작중인 모든 리소스들을 다른 노드로 이동시키려면, 해당 노드를 standby mode로 변경한다.
[root@cent7_m_hp1 /etc/haproxy]# pcs cluster standby node_name
리소스가 이동한다음 해당 cluster node를 다시 회복시킨다.
[root@cent7_m_hp1 /etc/haproxy]# pcs cluster unstandby node_name
2) 하나의 동작중인 리소스를 옮기려면, pcs resource move resource_id [destination_node] 를 이용
-- 리소스가 이동하고나면, 관련 모든 제약조건은 자동으로 삭제된다.
[root@cent7_m_hp1 /etc/haproxy]# pcs resource move Etc_VIP ha-slave.exam.com
[root@cent7_m_hp1 /etc/haproxy]# pcs resource relocate run Etc_VIP
[root@cent7_m_hp1 /etc/haproxy]# pcs resource relocate clear
[root@cent7_m_hp1 /etc/haproxy]# pcs resource relocate show
-------------- 기타 -----------------------------------
1. cluster node stop
[root@cent7_m_hp1 /var/lib/pcsd]# pcs cluster stop ha-slave.exam.com
-- stop 이 잘 안될경우
1) # pcs cluster disable 대상_노드이름 <-- disable 시킴
2) # pcs status <-- 상태 및 에러확인
3) # pcs resource cleanup <-- 에러 메시지 제거
# pcs resource cleanup HAProxy --node proxy24) # pcs status <-- 다시확인
5) # pcs cluster stop ha-slave.exam.com
6) # pcs status <-- 최종확인
2) 새로운 cluster resource를 생성
[root@cent7_m_hp1 /var/lib/pcsd]# pcs resource create Web_VIP ocf:heartbeat:IPaddr2 ip=192.168.56.203 cidr_netmask=32 op monitor interval=10s
[root@cent7_m_hp1 /var/lib/pcsd]#
[root@cent7_m_hp1 /var/lib/pcsd]# pcs status
Cluster name: MainWeb_VIP
WARNING: corosync and pacemaker node names do not match (IPs used in setup?)
Last updated: Mon Aug 29 13:15:06 2016 Last change: Mon Aug 29 13:15:04 2016 by root via cibadmin on cent7_m_hp1
Stack: corosync
Current DC: cent7_s_hp2 (version 1.1.13-10.el7_2.4-44eb2dd) - partition with quorum
2 nodes and 2 resources configured
Online: [ cent7_m_hp1 cent7_s_hp2 ]
Full list of resources:
Cluster_VIP (ocf::heartbeat:IPaddr2): Started cent7_s_hp2
Web_VIP (ocf::heartbeat:IPaddr2): Started cent7_m_hp1
PCSD Status:
cent7_m_hp1 (192.168.56.131): Online
cent7_s_hp2 (192.168.56.132): Online
Daemon Status:
corosync: active/disabled
pacemaker: active/disabled
pcsd: active/disabled
[root@cent7_m_hp1 /var/lib/pcsd]#
3) cluster node중 하나를 삭제
[root@cent7_m_hp1 /var/lib/pcsd]# pcs cluster node remove node_name
4) 삭제 node 다시 추가
-- node를 추가해도 관련 데몬들은 시작을 안함.
-- 추가된 노드를 시작시켜 줘야함.
[root@cent7_m_hp1 /etc/corosync]# pcs cluster node add node_name
[root@cent7_m_hp1 /etc/corosync]# pcs cluster start node_name
-- 기타 명령어 --
1. 상태확인
-- 두 서버가 online 상태인지 확인
[root@cent7_m_L1 /var/lib/pcsd]# pcs status
2. config error 체크
[root@cent7_m_L1 /etc/corosync]# crm_verify -L -V
error: unpack_resources: Resource start-up disabled since no STONITH resources have been defined
error: unpack_resources: Either configure some or disable STONITH with the stonith-enabled option
error: unpack_resources: NOTE: Clusters with shared data need STONITH to ensure data integrity
Errors found during check: config not valid
-- 위와 같은 에러발생시
-- no-quorum-policy=ignore 설정 안할 경우 cluster 간 failover가 부자연스러울 수 있음
[root@cent7_m_L1 /etc/corosync]# pcs property set stonith-enabled=false
[root@cent7_m_L1 /etc/corosync]# pcs property set no-quorum-policy=ignore
[root@cent7_m_L1 /etc/corosync]# crm_verify -L -V
[root@cent7_m_L1 /etc/corosync]# pcs property
Cluster Properties:
cluster-infrastructure: corosync
cluster-name: WebCluster
dc-version: 1.1.13-10.el7_2.4-44eb2dd
have-watchdog: false
no-quorum-policy: ignore
stonith-enabled: false
3. 서비스(리소스 or 가상아이피) 등록
-- master node에서만 실행
[root@cent7_m_L1 /etc/corosync]# pcs resource create MainWebVirtualIP IPaddr2 ip=192.168.56.201 cidr_netmask=32
4. 리소스 전체 확인
[root@cent7_m_hp1 /etc/corosync]# pcs resource --full
5. 리소스 수정
[root@cent7_m_hp1 /etc/corosync]# pcs resource update Cluster_VIP ip=192.168.56.202 cidr_netmask=32 op monitor interval=10s
6. 제약조건
[root@cent7_m_hp1 /etc/corosync]# pcs constraint colocation add HAProxy_Main HAProxy_Main_VIP INFINITY
[root@cent7_m_hp1 /etc/corosync]# pcs constraint order HAProxy_Main_VIP then HAProxy_Main
[root@cent7_m_hp1 /etc/corosync]# pcs constraint location HAProxy_Main_VIP prefers node_id
[root@cent7_m_hp1 /etc/corosync]# pcs constraint location HAProxy_Main prefers node_id
-- 확인
[root@cent7_m_hp1 /etc/corosync]# pcs constraint
[root@cent7_m_hp1 /etc/corosync]# pcs constraint list
[root@cent7_m_hp1 /etc/corosync]# pcs constraint list --full
7. Enable, disable resource
-- pcs resource disable resource_id [--wait[=n]]
-- pcs resource enable resource_id [--wait[=n]]
[root@cent7_m_hp1 /etc/haproxy]# pcs resource disable HAProxy_Main
[root@cent7_m_hp1 /etc/haproxy]# pcs resource enable HAProxy_Main
[root@cent7_m_hp1 /etc/haproxy]# pcs resource disable HAProxy_Main --wait=5
[root@cent7_m_hp1 /etc/haproxy]# pcs resource enable HAProxy_Main
8. pcs status - fail action 메시지 clear
-- pcs status 에 나오는 fail action 메시지 제거
[root@cent7_m_hp1 /etc/haproxy]# pcs resource cleanup
2017년 6월 27일 화요일
[LINUX]DRBD (블럭 디바이스 HA)
출처: http://onecellboy.tistory.com/330
참고 :
DRBD 란?
DRBD는 블럭 디바이스를 HA(High Availabilty, 고가용성) 구성을 위한 Network Raid-1(mirroring) 유틸이다.
서비스 중단에 따른 Service Downtime 을 최소화하기 위해 사용된다.
DRBD 는 Raid-1 처럼 mirroring 만 하는 유틸이므로 linux heartbeat 와 같은 HA유틸과 같이 사용하는 것을 추천한다.
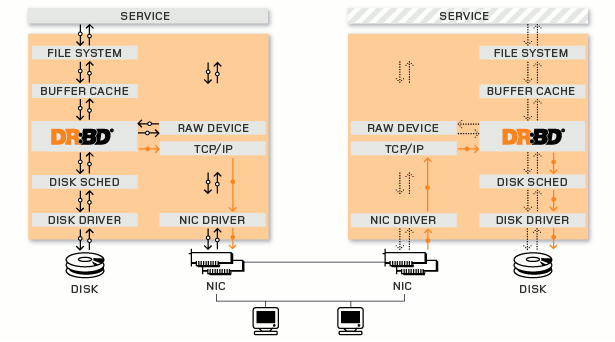
DRBD는 실제 사용하는 블럭 디바이스의 I/O 명령을 대신 받아서 처리한다. 실제 블럭 디바이스에 데이터를 쓰고 해당 데이터를 네트워크를 통해 mirroring 되는 장치로 보낸다.
예를 들어 /dev/sda 란 실제 블럭 디바이스가 있고 이를 중간에서 대신 처리하는 drbd 디바이스인 /dev/drbd0 가 있다면 모든 연산은 /dev/drbd0 로 보내면 이 연산을 /dev/sda 로 drbd가 대신 처리하고 network를 통해 다른 노드의 mirroring 되는 장비로 보낸다.
DRBD 상태는 primary 와 secondary 가 있으며 primary 에서만 연산이 가능하다. secondary는 primary를 계속 mirroring 한다.
DRBD 설치
설치 환경
OS : Ubuntu 14.014 LTS
DRBD : DRBD 8.4.4
primary ip : 192.168.3.11
primary hostname : drbd-1
primary device : /dev/sdb # 실제 mirroring 할 디바이스
secondary ip : 192.168.3.12
secondary hostname : drbd-2
secondary device : /dev/sdc # 실제 mirroring 할 디바이스
1. /etc/hosts(primary , secondary 둘다 설정)
drbd 설정시 hostname 을 통해 노드를 구분함으로 이를 /etc/hosts파일에 등록해야한다.
$ vi /etc/hosts
192.168.3.11 drbd-1
192.168.3.12 drbd-2
2. 패키지 설치 및 kernel module 로드(primary , secondary 둘다 설정)
$ sudo apt-get install drbd8-utils
$ sudo modprobe drbd
module 로드 확인
$ lsmod | grep drbd
3. DRBD 설정(primary , secondary 둘다 설정)
설정 파일은 /etc/drbd.d/ 에 넣으면 된다. 이전 버전의 경우는 /etc/drbd.conf 이다.
현재는 /etc/drbd.conf 에서 /etc/drbd.d/ 하위의 설정파일을 불러 오는 방법을 쓴다.
$ cat /etc/drbd.conf
# You can find an example in /usr/share/doc/drbd.../drbd.conf.example
include "drbd.d/global_common.conf";
include "drbd.d/*.res";
# drbd 설정 파일 만들기
$ sudo vi /etc/drbd.d/{name}.res
resource "{resource_name}"
{
protocol {A | B | C};
disk {on-io-error detach;}
syncer {
}
on {primary-hostname} {
device /dev/{drbd_logical_name};
disk /dev/{raw_device_name};
address {ip}:{port};
meta-disk internal;
}
on {secondary-hostname} {
device /dev/{drbd_logical_name};
disk /dev/{raw_device_name};
address {ip}:{port};
meta-disk internal;
}
}
{} 인 곳에 내용을 넣어주면 된다.
- resource : 임의의 리소스 이름을 넣으면 된다.
- protocol : 동기화 방식인데, A는 비동기 방식으로 속도는 빠르나 데이터 손실의 위험이 있다. B는 메모리 까지만 동기화 방식으로 속도가 A보다는 느리지만 꽤빠른편이고 데이터 손실 위험은 A보다 적다. C는 동기 방식으로 primary 에서의 연산이 secondary에서도 완료되어야 작업이 완료되는 방식으로 속도는 제일 느리나 데이터 신뢰성을 높다. 데이터의 안정성은 C가 제일 좋다.
- on : 노드를 구분한다. hostname을 써주면 된다.
- device : drbd 논리 디바이스 이름이다. 해당 이름은 임의로 주면 drbd 동작시 해당 이름의 논리 디바이스를 만든다. 전통적으로는 drbd0, drbd1 이런 식으로 이름짓는다.
- disk : 실제 디바이스 이름을 넣는다.
- address : ip와 port를 넣는다.
- meta-disk : drbd 가 동작하기 위한 메타데이터 저장 공간이며 디바이스를 따로 지정할 수 도 있지만 internal로 지정하면 disk 항복에 지정된 실제 디바이스의 공간중 128MB를 이용하여 메타 데이터용으로 쓴다.
예) $ sudo vi /etc/drbd.d/drbd_test.res
resource "test01"
{
protocol C;
disk {on-io-error detach;}
syncer {
}
on drbd-1 {
device /dev/drbd0;
disk /dev/sdb;
address 192.168.3.11:7791;
meta-disk internal;
}
on drbd-2 {
device /dev/drbd0;
disk /dev/sdc;
address 192.168.3.12:7791;
meta-disk internal;
}
}
위 설정을 보면 drbd-1의 /dev/sdb 와 drbd-2의 /dev/sdc 간 mirroring 을 한다는 것이다.
4. DRBD 실행(primary , secondary 둘다 )
drbd-1$ sudo service drbd start
drbd-2$ sudo service drbd start
5. METADATA 생성(primary , secondary 둘다 )
* 주의 : Metadata 생성전 DRBD 볼륨으로 사용할 공간은 파일시스템이 생성되어 있지 않아야한다.
미리 파일시스템이 생성된 상태라면 아래와 같은 에러가 발생할 경우
Command 'drbdmeta 1 v08 /dev/xxx internalcreate-md' terminated with exit code 40
dd를 이용하여 MBR 영역을 없애주어야한다.
$ dd if=/dev/zero of=/dev/sdb bs=1M count=128
# Metadata 생성 명령
$ sudo drbdadm create-md all
위 명령을 수행하면 device 에 지정했던(/dev/drbd0) 디바이스가 생성된다.
6. DRBD primary 만들기(primary 에서 명령)
DRBD 가 처음실행되면 secondary/secondary로 동작한다. 이를 primary/secondary로 만들어 mirroring이 진행될 수 있게 해야한다.
primary 로 사용할 drbd-1 호스트에서 아래의 명령을 호출한다.
$ sudo drbdadm primary {resource_name}
# 위의 예제 설정에서는 resource_name 이 test01이었다.
예) $ sudo drbdadm primary test01
DRBD 모니터링
정상 동작하는지 확인해보자.
모니터링 명령으로는
$ cat /proc/drbd
$ sudo drbdadm role {resource_name}
$ sudo service drbd status
가 있다.
$ cat /proc/drbd
version: 8.4.3 (api:1/proto:86-101)
srcversion: 88927CDF07AEA4F7F2580B2
0: cs:Connected ro:Primary/Secondary ds:UpToDate/UpToDate C r-----
ns:50 nr:117650 dw:117695 dr:3746 al:2 bm:9 lo:0 pe:0 ua:0 ap:0 ep:1 wo:f oos:0
$ sudo drbdadm role {resource_name}
예)
$ sudo drbdadm role test01
Primary/Secondary
$ sudo service drbd status
drbd driver loaded OK; device status:
version: 8.4.3 (api:1/proto:86-101)
srcversion: 88927CDF07AEA4F7F2580B2
m:res cs ro ds p mounted fstype
0:r0 Connected Primary/Secondary UpToDate/UpToDate C /tmp/mnt ext3
DRBD 운영
1. 파일 시스템으로 포맷하고 mount 하기
primary 노드에서 디바이스를 ext3 로 포맷팅하고 mount
* 주의 : /dev/sdb 를 포맷팅하는 것이 아니라 이를 대신 처리해주는 drbd 논리 디바이스인 /dev/drbd0에 수행해야한다.
$ sudo mkfs.ext3 /dev/drbd0
$ sudo mount /dev/drbd0 /mnt
* 주의 : secondary 노드의 블록 디바이스는 mirroring 만 되는 것이다. mount 되지 않는다. secondary 노드의 블록 디바이스를 mount 하기 위해서는 primary를 secondary 로 만들고 secondary 를 primary 로 만들어야한다.
2. mirroring 확인
primary 노드에서 마운트 진행하였고 여기에 파일을 하나 만든다.
drbd-1$ sudo touch /mnt/test
secondary 에 mirroring 되는지 확인하기 위해 secondary를 primary로 만들 것이다.
primary 노드는 하나밖에 지정못하므로 primary 를 우선 secondary 로 만들어야한다. secondary 로 만들기 전에 우선 umount 해야한다.
# primary를 secondary 만들기
drbd-1$ sudo umount /mnt
drbd-1$ sudo drbdadm secondary test01 #test01은 resource_name이다.
# secondary를 primary 만들기
drbd-2$ sudo drbdadm primary test01
# secondary 노드 였던 drbd-2에서 마운트하여 확인하기
drbd-2$ sudo mount /dev/drbd0 /mnt
drbd-2$ ls -al /mnt
확인해보면 drbd-1에서 생성했던 test 란 파일이 보일 것이다.
3. secondary를 primary 만들기
secondary를 primary 로 만드는 경우는 primary 노드가 죽었을 때 이다.
primary 노드가 죽었다면 secondary를 primary 로 만들어 서비스를 지속시켜야한다.
secondary 노드에서 아래의 명령을 통해 확인하면 primary 노드의 연결이 끊긴것을 확인할 수 있다.
drbd-2$ cat /proc/drbd
version: 8.4.3 (api:1/proto:86-101)
srcversion: 88927CDF07AEA4F7F2580B2
0: cs:WFConnection ro:Secondary/Unknown ds:UpToDate/DUnknown C r-----
ns:0 nr:43 dw:43 dr:1456 al:0 bm:2 lo:0 pe:0 ua:0 ap:0 ep:1 wo:f oos:0
drbd-2$ sudo service drbd status
drbd driver loaded OK; device status:
version: 8.4.3 (api:1/proto:86-101)
srcversion: 88927CDF07AEA4F7F2580B2
m:res cs ro ds p mounted fstype
0:r0 WFConnection Secondary/Unknown UpToDate/DUnknown C
secondary 를 primary 로 만든다.
drbd-2 $ sudo drbdadm primary {resource_name}
예) resource_name 이 test01일때
drbd-2 $ sudo drbdadm primary test01
secondary 를 primary로 만들었는지 확인
drbd-2$ cat /proc/drbd
version: 8.4.3 (api:1/proto:86-101)
srcversion: 88927CDF07AEA4F7F2580B2
0: cs:WFConnection ro:Primary/Unknown ds:UpToDate/DUnknown C r-----
ns:0 nr:43 dw:43 dr:2912 al:0 bm:2 lo:0 pe:0 ua:0 ap:0 ep:1 wo:f oos:0
drbd-2$ sudo service drbd status
drbd driver loaded OK; device status:
version: 8.4.3 (api:1/proto:86-101)
srcversion: 88927CDF07AEA4F7F2580B2
m:res cs ro ds p mounted fstype
0:r0 WFConnection Primary/Unknown UpToDate/DUnknown C
4. secondary 노드를 교체
위의 상황처럼 primary 가 죽거나 secondary 가 죽거나 하여 mirroring 할 경로를 바꾸어야할 때
예를 들어 secondary 였던 drbd-2 의 장애로 drbd-3 에 mirroring 을 해야할 경우이다.
우선 primary 의 설정파일을 drbd-3로 바꾼다.
drbd-1 $ sudo vi /etc/drbd.d/{name}.res
예)
drbd-1 $ sudo vi /etc/drbd.d/test.res
resource "test01"
{
protocol C;
disk {on-io-error detach;}
syncer {
}
on drbd-1 {
device /dev/drbd0;
disk /dev/sdb;
address 192.168.3.11:7791;
meta-disk internal;
}
on drbd-3 {
device /dev/drbd0;
disk /dev/sdb;
address 192.168.3.13:7791;
meta-disk internal;
}
}
그리고 secondary 로 사용할 drbd-3 에도 동일하게 설정하고 drbd를 실행시킨다. 실행시키면 primary 의 연결을 대기한다.
drbd-3 $ sudo service drbd start
그리고 drbd-1 에서 drbd-3 로 연결하는 명령을 수행한다.
drbd-1 $ sudo drbdadm connect test01 # test01은 .res 파일 내의 resource_name 이다.
출처: http://onecellboy.tistory.com/330 [신불사 - 신현호라 불리는 사나이]
피드 구독하기:
글 (Atom)